Docker entrypoint vs cmd

原文

Docker has a default entrypoint which is /bin/sh -c but does not have a default command.

When you run docker like this: docker run -i -t ubuntu bash the entrypoint is the default /bin/sh -c, the image is ubuntu and the command is bash.

The command is run via the entrypoint. i.e., the actual thing that gets executed is /bin/sh -c bash. This allowed Docker to implement RUN quickly by relying on the shell’s parser.

Later on, people asked to be able to customize this, so ENTRYPOINT and –entrypoint were introduced.

Everything after ubuntu in the example above is the command and is passed to the entrypoint. When using the CMD instruction, it is exactly as if you were doing docker run -i -t ubuntu . will be the parameter of the entrypoint.

You will also get the same result if you instead type this command docker run -i -t ubuntu. You will still start a bash shell in the container because of the ubuntu Dockerfile specified a default CMD: CMD [“bash”]

As everything is passed to the entrypoint, you can have a very nice behavior from your images. @Jiri example is good, it shows how to use an image as a “binary”. When using [“/bin/cat”] as entrypoint and then doing docker run img /etc/passwd, you get it, /etc/passwd is the command and is passed to the entrypoint so the end result execution is simply /bin/cat /etc/passwd.

Another example would be to have any cli as entrypoint. For instance, if you have a redis image, instead of running docker run redisimg redis -H something -u toto get key, you can simply have ENTRYPOINT [“redis”, “-H”, “something”, “-u”, “toto”] and then run like this for the same result: docker run redisimg get key.
华为交换机 ACL 单向流量控制

我们假设有VLAN A和B,需要做到A可以访问B,而B不可以访问A
A的地址段为 X.X.X.X/24
B的地址段为 Y.Y.Y.Y/24

对于单向流量的控制,一般来说是属于防火墙的功能。但实际上,交换机也是可以通过ACL的灵活配置,来实现最基本的单向流量控制。具体配置如下:

对于ICMP协议,需要允许B->A的icmp echo-reply报文:

1
2
acl 3001
rule 5 permit icmp source Y.Y.Y.Y 0.0.0.255 destination X.X.X.X 0.0.0.255 icmp-type echo-reply

对于TCP协议,需要允许B->A,报文头中SYN Flag的类型为ack(010000)或rst(000100)的TCP报文:
———-V2R2版本及以前的配置————

1
2
rule 9 permit tcp source Y.Y.Y.Y 0.0.0.255 destination X.X.X.X 0.0.0.255 tcp-flag ack
rule 10 permit tcp source Y.Y.Y.Y 0.0.0.255 destination X.X.X.X 0.0.0.255 tcp-flag rst

———-V2R3版本及以后的配置————

1
rule 10 permit tcp source Y.Y.Y.Y 0.0.0.255 destination X.X.X.X 0.0.0.255 tcp-flag established

对于UDP协议,由于其为无状态的特性,无法实现单通,基于业务优先原则,放开所有UDP协议文:

1
rule 15 permit udp source Y.Y.Y.Y 0.0.0.255 destination X.X.X.X 0.0.0.255

最后,deny其他B->A的IP流量,并基于业务优先原则,放开其他所有未知流量:

1
2
rule 20 deny ip source Y.Y.Y.Y 0.0.0.255 destination X.X.X.X 0.0.0.255
rule 25 permit ip

将该ACL通过traffic-filter应用于VLAN之上

1
traffic-filter vlan B inbound acl 3001

Postgresql join

postgresql 中join的选项

  • Nested Loops(O(n2))

    1
    2
    3
    4
    5
    6
    for x in table1:
    for y in table2:
    if x.field == y.field
    issue row
    else
    keep doing
  • Hash joins

    1
    2
    3
    Hash join
    Sequentialscan table 1
    Sequentialscan table 2
  • Merge joins(O(n * log(n)))

    1
    2
    3
    4
    5
    6
    7
    8
    9
    Merge join
    Sort table 1
    Sequetial scan table 1
    Sort table 2
    Sequetial scan table 2
    ---
    Merge join
    Index scan table 1
    Index scan table 2

Postgresql static sys-view 性能

参考

  1. explain 计划

    1
    explain (analyze ,verbose ,consts ,timing ,buffers) Select ...
  2. pg_stat_activity(观察当前系统活动),每个连接一行记录.

    1
    2
    \d pg_stat_activity
    Select pid ,query_stat ,state_change ,state ,query From pg_stat_activity;
    • pg_cancel_backend. (Select pg_cancel_backend(pid)),终止pid,保留连接.
    • pg_terminate_backend.
  3. 检查数据库,pg_state_database

    1
    \d pg_state_database
  4. 检查表 pg_stat_user_tables ,pg_statio_user_tables

    1
    2
    3
    4
    5
    6
    7
    8
    \d pg_stat_user_tables
    Select schemaname, relname ,seq_scan ,seq_tup_read,
    seq_tup_read /seq_scan as avg, idx_scan
    From pg_stat_user_tables
    Where seq_scan > 0
    Order By seq_tup_read Desc
    Limit 25;
    \d pg_statio_user_tables
  5. 深入索引 pg_stat_user_indexes

    1
    2
    3
    4
    5
    6
    7
    \d pg_stat_user_indexes
    Select schemaname ,relname ,indexrelname ,idx_scan,
    pg_size_pretty(pg_relation_size(indexrelid)) as idx_size,
    pg_size_pretty(sum(pg_relation_size(indexrelid))
    Over (Order By idx_scan ,indexrelid)) as total
    From pg_stat_user_indexes
    Order By 6;
  6. 使用 pg_stat_statements

    1. postgresql.conf 中将 pg_stat_statements 加入 shared_preload_libraties.
    2. 重启 db server.
    3. 在你的database中运行 CREATE EXTESION pg_stat_statements.
      1
      2
      3
      4
      5
      6
      7
      8
      9
      10
      11
      \d pg_stat_statements
      Select round((100 * total_time /sum(total_time)
      Over ())::numeric, 2) percent,
      round(total_time::numeric ,2) as total,
      calls,
      round(mean_time::numeric ,2) as mean,
      substring(query, 1, 40)
      From pg_stat_statements
      Order By total_time DESC
      Limit 10;
      Select pg_stat_statements_reset();

Postgresql bitmap heap/index scan

转载

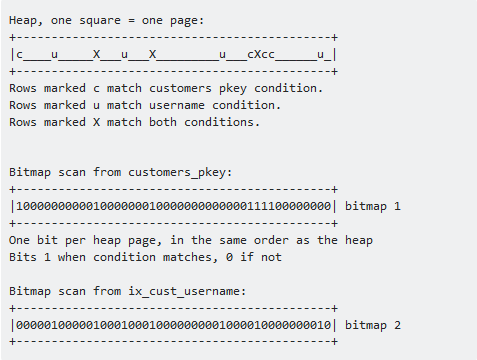
  • index scan 扫描索引,查找后立即读取对应数据页,是随机读.

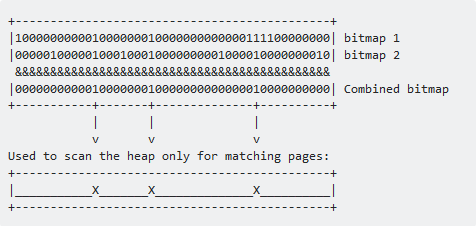
  • bitmap heap scan 最终是顺序读. 一般用在多个索引同时使用时或单个索引多次使用时.

举例(先bitmap index scan 再bitmap heap scan):

bitmaps 按为与

bitmap heap scan 读入对应的页,再次按指定条件查找记录(re-checked).
.

Postgresql -- Schema

postgresql 架构命令

1
2
3
4
5
6
7
8
9
Select current_schema();
Show search_path;
Create Schema ...;
Alter Schema ...;
Drop Schema ...;
Set search_path To ..., ...
Grant Usage On Schema schema_name To user_name
Grant Create On Schema schema_name To user_name;
\dn #get the list of schemas;

Postgresql -- Move Data Directory

移动PostgreSQL数据目录

转载

  • 移动数据目录

    1
    2
    3
    4
    5
    $ sudo -u postgres psql
    postgres# SHOW data_directory
    $ sudo systemctl stop postgresql
    $ sudo systemctl status postgresql # 确认已停止.
    $ sudo rsync -av /var/lib/postgresql /mnt/... # -a 保留权限
  • 指向新数据库

    1
    $ sudo vim /etc/postgresql/.../postgresql.conf # 修改: data_directory = '新路径...'
  • 重启PostgreSQL,并验证

    1
    2
    3
    4
    $ sudo systemctl start postgresql
    $ sudo systemctl status postgresql
    $ sudo -u postgresql psql
    postgres=# SHOW data_directory

Postgresql client Connection options

PostgreSQL 客户端常用的连接参数
注意:密码是不可能写在命令行上的,设置密码用.pgpass,环境变量

1
2
3
4
5
Connection options:
-d, --dbname=DBNAME
-h, --host=HOSTNAME
-p, --port=PORT
-U, --username=NAME connect as specified database user

使用环境变量 连接PostgreSQL

  • PGHOST
  • PGPORT
  • PGUSER
  • PGPASSWORD
  • PGDATABASE

使用.pgpass 连接PostgreSQL
在你的HOME目录下创建.pgpass文件,字段可用*
格式: hostname:port:database:username:password

1
chmod 0600 ~/.pgpass